How to Reassemble a Boxed Bicycle:

To help, we offer these step-by-step instructions that make reassembly easy. It should only take about 30 minutes to go from opening the box to pedaling in that vacation paradise. Here's how:
Note that we've prepared this article assuming that your bicycle was professionally packed. We do a minimal disassembly to make rebuilding your bike easier. If your bicycle was unprofessionally packed, more assembly steps may be required.
Materials
First, round up these few basic assembly tools and put them in a suitcase you plan to check:
- Torque wrench capable of reading from 2 to 20 newton meters (nm)
- 4, 5 and 6mm Allen wrenches and possibly a T25 Torx (for tightening the seatpost and handlebars)
- lube (for installing pedals and lubing the chain)
- 15mm open-end or 8mm hex wrench (for installing the pedals)
- packing tape (for resealing the box for the return trip)
- Also: print and pack this page just in case that hotel internet connection is on the fritz.
1. Unbox the bike
We use packing tape to seal bike boxes. Cut the tape with a knife to open the box. Don't cut the box because you may slice your tires or frame. Once the box flaps are untaped, carefully fold them back and out of the way. When bike boxes are sealed at the factory, they're stapled shut with giant brass staples which we remove (but not everyone remembers). Watch out for these because they can cut you and/or scratch your bike. To be safe, pull any staples out and throw them away. Now you can remove the bike and box contents, pulling out any loose items first. Work carefully to avoid banging parts against the bike and scratching the paint.
2. Inspect the bike
Remove the packing material from the frame and wheels. And remove the items from the small-parts box. Look for dents, paint scratches or any other shipping damage. If the frame or any parts were harmed in shipping, contact the freight carrier. If you'll be boxing the bike for the return trip, put all the packing material inside the box.
3. Install the front wheel
Insert the quick release into the front wheel and install the wheel in the fork with the quick-release handle on the non-drivetrain side. Make sure that the axle is inserted fully into the fork and close the quick release to secure the wheel. The quick release must be closed tightly. The effort of closing it should leave the lever's impression on your palm. If not, open the quick release, tighten the adjustment and close the QR. Double check that the wheel is fully inserted and properly centered between the fork blades (if it's skewed to one side, the brake won't work correctly).
4. Install the stem and/or handlebars If your handlebars were removed separately (the stem will be attached to the bike), unscrew the bar-clamping bolts in the stem, install and center the handlebars (be careful not to tangle the cables) and reinsert and snug the stem bolts: use the torque wrench and under no circumstances exceed the maximum torque rating samped on the stem. Align the handlebars so that you can comfortably reach the brake and shift controls and secure the stem bolts: use the torque wrench and under no circumstances exceed the maximum torque rating staped on the handle bars.
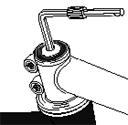
If your stem and handlebars were removed as a unit, install the stem, and partially tighten the stem expander bolt (for threaded forks) or steerer clamp bolt(s), (for threadless forks) using the appropriate Allen wrench. If yours is a threadless system, install the top cap and bolt and snug the bolt with the appropriate Allen wrench (picture) to adjust the steering bearings (there should be no play when you push/pull on the fork and it should turn freely). Finally, align the handlebars/stem with the front wheel and securely snug the stem bolt(s). Test your work by striking the bars with your hand to see if they move sideways. If so, recenter and tighten them until they hold fast: use the torque wrench and under no circumstances exceed the maximum torque rating stamped on the parts.
5. Install the seat and post
Install the seat/seatpost into the frame, setting it to the correct height (you did mark it, didn't you?). If you're not sure how high to put it, adjust it so that with the balls of your feet on the pedals, you have a slight bend in your knees at the bottom of the pedal stroke. When the height's right and the seat is aligned with the frame, tighten the seatpost-clamping bolt in the frame securely with the torque wrench and under no circumstances exceed the maximum torque rating stamped on the seat collar. If the seat height wasn't marked before, now would be a good time. A simple way to do this is to wrap electrical tape around the seatpost where it meets the frame.
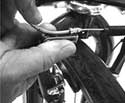
6. Reattach the front brake or cable If you're assembling a bike with linear-pull brakes (also called "V-brakes"), reconnect the brake by squeezing the brake arms together and inserting the front-brake-cable noodle into its holder on the brake (picture). Make sure it's completely seated, slide the rubber boot onto the noodle's tip and squeeze the brake lever a few times to make sure the brake is working properly.
If you're assembling a bike with sidepull brakes (most road bikes), reattach the brake to the fork crown. Simply slip the brake bolt into the hole in the crown and attach the fixing bolt in back. If there are spacers on the bolt, these go on the front side of of the crown between the brake and bike. Squeeze the front brake lever and tighten the brake fixing bolt to secure and center the brake. When it's tight, check that the brake is working properly by applying it a few times.
7. Install the pedals
Pedals are tricky, so work carefully. There's a right and left pedal and they're usually marked on the axles with an R and an L. It's crucial to install the pedal in the correct crankarm because the threading is different and you can ruin the crankarm if you force the wrong pedal into it. Apply a few drops of lube to the pedal axles. Then, find the pedal marked R and turn the axle clockwise by hand to start it in the right crankarm (the one with the chainrings). For the other pedal, turn counter-clockwise by hand to start it. Finish gently tightening the pedals with the 15mm wrench. Make sure they're tight but not overtightened.
8. Hit the road
Before pedaling into the sunset, make a couple of final checks: Is your seat-bag repair kit in place, pump attached, water bottle full? Are the tires fully inflated? We also recommend taking a short spin to check shifting, braking and bike fit because it's much easier taking care of minor adjustments such as these at the hotel room than out on the trail. And, bring your Allen wrenches with you on rides just in case any adjustments slip. All set? Have fun!
Remember: if you have questions, we're just a phone call away (503-699-8665) (during business hours). Just give a ring and we'll be happy to talk you through any difficulties!
When in doubt, use the torque wrench!
